Sakura Cherry blossom tree – Fine art mural Japanese restaurant
- Client: Hagi Japanese Restaurant / Centara Grand Beach Resort & Villas Hua Hin
- Location: Hua Hin, Thailand
- Theme: Japanese inspired cherry blossom (Sakura tree)
- Dimensions: 3m x 2m
- Paint Duration: 2 days
- Materials: Acrylic outdoor heavy-duty paint and brushes
- Objective: Create a stylised cherry blossom mural, traditional Japanese inspired painting custom-designed for the prominent feature wall in Japanese restaurant to enhance the zen vibes and dining experience.
Get the full scope below, or send me a message now to discuss bringing your own Japanese themed art commission to life.
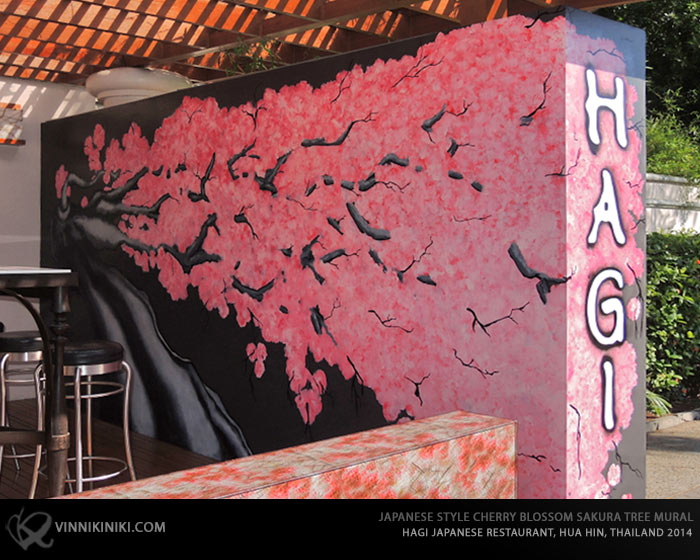
Sakura tree mural art…I was hired by the very delicious Hagi Japanese restaurant situated in the gorgeous Thai getaway location that is Hua Hin to paint this modest size mural of the Sakura cherry blossom tree. Being a big fan of Japanese art (and food) it’s always an honour and delight to paint in this mural art style. The actual space is around 4.5m x 2m near the roadside of the restaurant so people can see it as they pass by on the street. This article is a guide to painting a Sakura mural and recount of the how the deal went down.
Whenever I get hired to paint murals it’s always best to have a good initial chat to get a proper idea of what style, images and ideas the client has in mind. In this case it was a bit different. The client had already seen my cherry blossom style murals at another Japanese restaurant in Bangkok and wanted to have something similar painted at his own restaurant. That takes a lot of the guesswork and planning stage out. Normally I would ask the client to send me images of what kind of styles and images they like, in this case it was more a less a matter of recreating a tree I’d painted before.
However as simple as that may sound, each mural job comes with its own unique situation…and more to the point – painting environment.
That’s why I always like to physically inspect the spaces I’m painting personally to figure out exactly the best materials to use for each given job. Also important to note that Hagi restaurant was already open for business which meant I had to fit around the existing restaurant schedule for opening time. Not a problem, I will paint when it’s possible and sleep when it’s not 😉
Unfortunately this was one of those times where the location was far away and traveling just for an initial meeting was not an option. Luckily it’s easy enough to find good paint supplies in the area where I was going to work so together with my own supplies from the studio I’d be fine.
This Japanese style mural was painted at Hagi Japanese restaurant in Hua Hin Thailand 2014. I painted it using mixture of outdoor emulsion paints. The project had to be completed in 3 stages. 1. Proposal 2. Prepare 3. Paint.
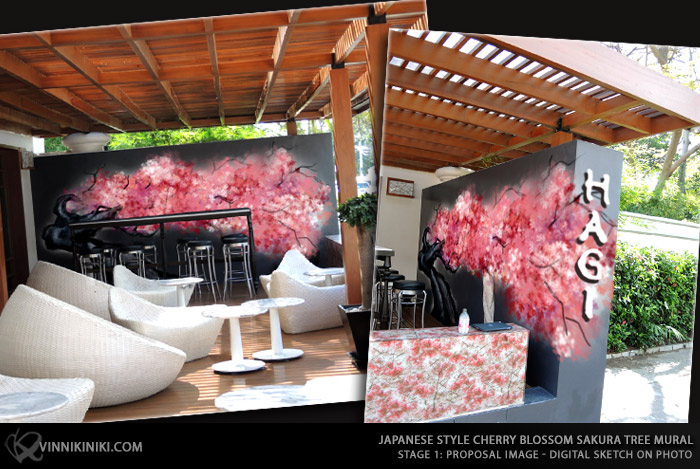
Though I knew what I was going to paint, I wanted to make sure that I and the client were on the same wavelength. So as I do with most of my jobs the initial stage was creating a digital proposal for the how the final painting was to look in the space itself. I asked the restaurant to send me a photo of the space and proceeded to draw my proposal straight onto that. Actually what I did was to copy and paste the previous Sakura tree I’d painted and then extend or warp the image in order to make it fit nicely for the space at the Hagi restaurant. The image below is the proposal I sent to the client.
How to paint a Sakura Cherry Blossom tree, a guide to painting murals.
>> STAGE 1 PROPOSAL IMAGE:
The proposal (photo above) is the first sketching i’ll do before actually painting anything. This helps two fold… Firstly it gives the client a good idea of what the final piece will look like. It also allows me to mentally map out the points on the surface i will be painting. I don’t use projectors or any strict measuring, so i always tell the client the proposal is 80-90% accurate to what the final piece will look like. Certainly it’s hard to achieve some specific textures and painting effects in Photoshop… Plus it’s just a proposal, time needs to be spent painting!
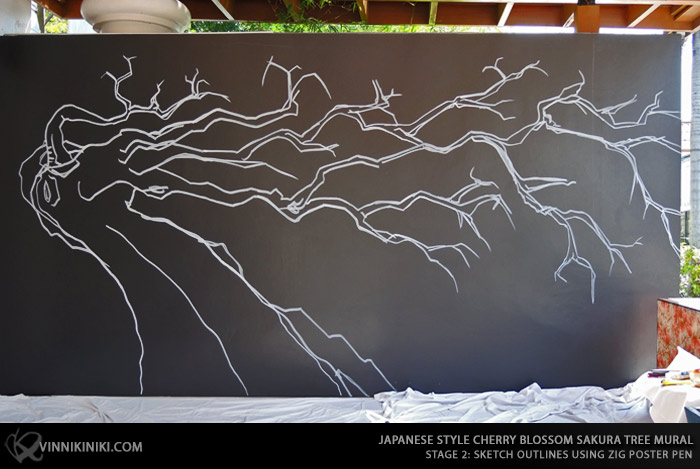
>> STAGE 2 SKETCH OUTLINES:
Simply mapping out the outlines of the Cherry blossom tree using a Zig posterman paint marker. I’m using a white as it’s easier to see on the dark background and easier to cover with another colour.
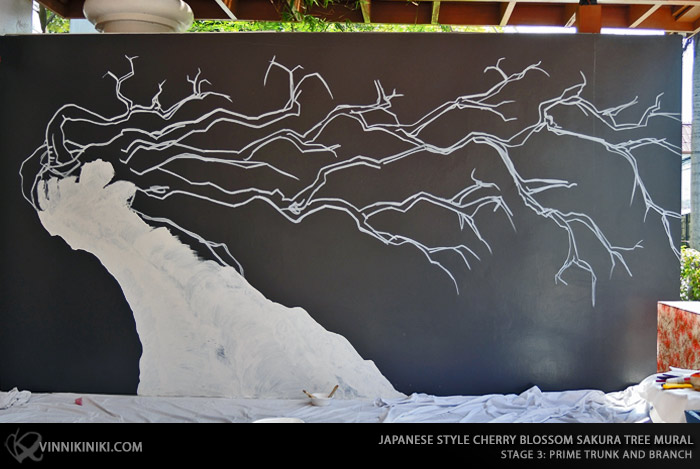
>> STAGE 3 PRIME THE SURFACE:
I’m priming the surface using a all weather guard tough exterior masonry primer. This particular brand i believe was Berger, but it doesn’t really matter, spend a bit more on your primer and your guaranteed against any major chipping, flaking and the general strength of the art will stay up for longer. In this case the white allows more play with colour tones. Using a light colour on a dark usually means many layers and dull colours, priming the surface solves all these issues
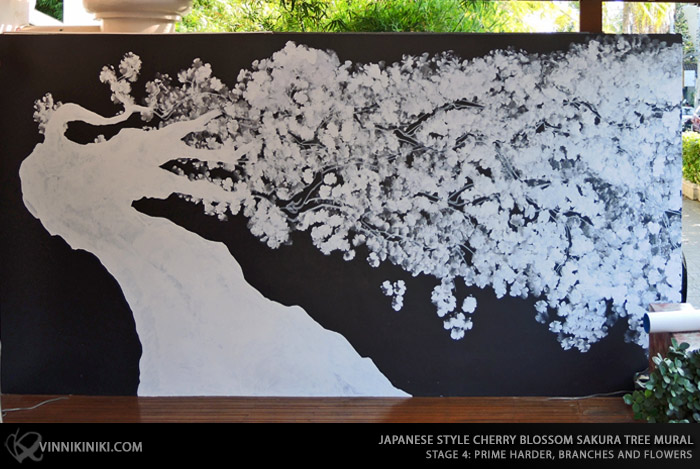
>> STAGE 4 MO’ PRIME:
Yes more priming, soemtimes it’s a good idea to have two coats of prime especially when painting on a darker colour. I choose to semi-prime the flowers in order to get a bit of depth.
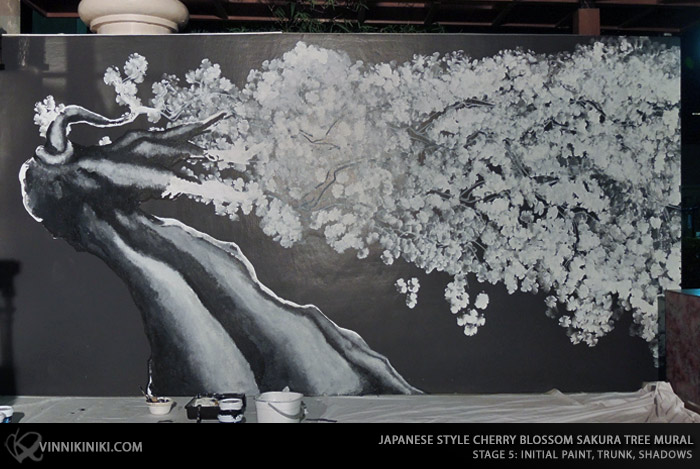
>> STAGE 5 PAINT THE TRUNK:
Using the exterior emulsion paints i bought i’m starting by filling out the trunk of the Sakura tree, as you can see here i start fairly rough and worry about the fine blending for later, right now i’m getting base colours down. Usually i need to balance the image out by painting other areas, so this is as good as it will get for now.
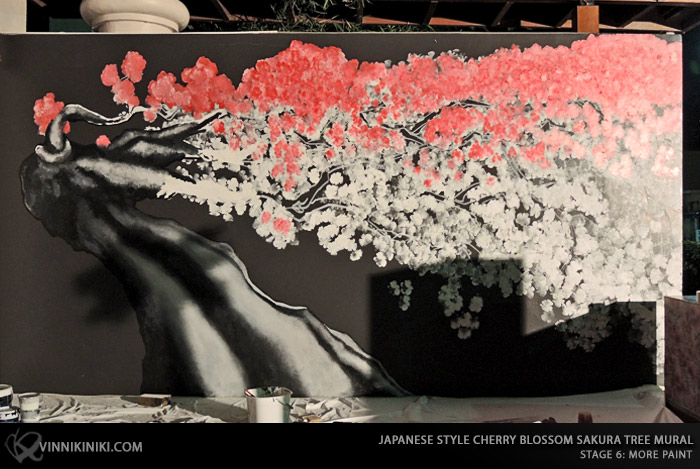
>> STAGE 6 PAINT FLOWERS:
Whenever possible paint from the top down, this will help if you dripping a lot, no problem to drip onto a surface your yet to paint. Also this is the first layer of flower details. I’m starting dark almost red which i will lighten on the second coat of paint. I’m using a sponge which i’ve cut into a rough flower shape. I’ve got a few different shapes of sponges prepared so that i can alternate the design a bit.
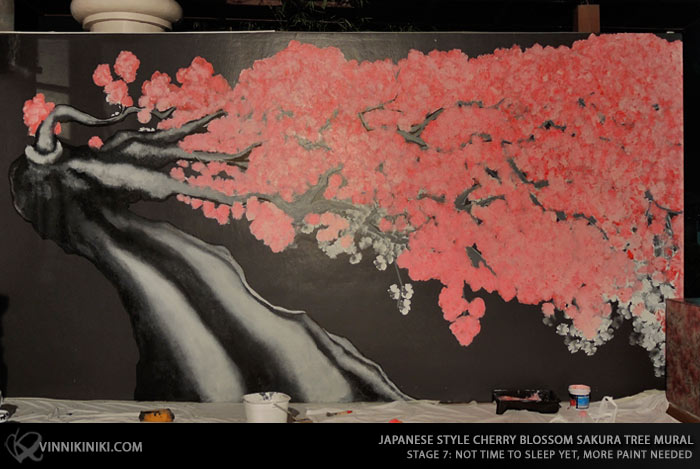
>> STAGE 7 FIRST LAYER OF PAINT:
In this photo you can see most of the paint is laid down. In this photo you can see that i’ve actually got two layers of flower on the top part of the Sakura tree. This is because i can’t paint over wet, so i’m alternating between first layer paint flowers and second layer detail. You can see that by using a range of deep and light pinks you can make the cherry blossom flower have more details, using a sponge with this technique saves A LOT of time.
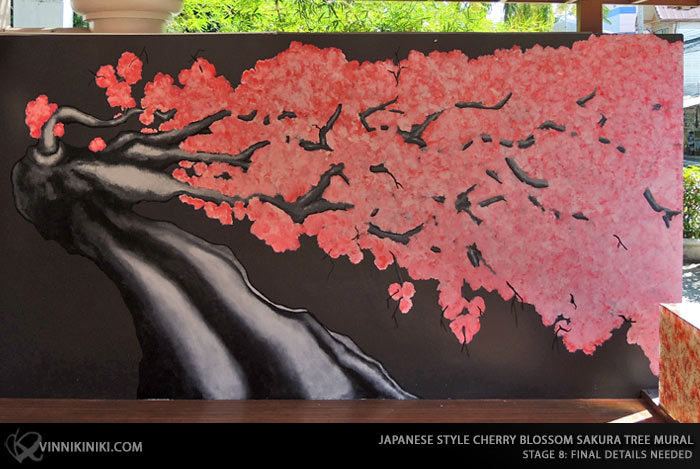
>> STAGE 8 FINAL DETAILS:
At this point the mural is around 95% complete. I was not quite happy with it at this point and realised it needs more branch detail. Using a posca black marker pen i added some definition around the trunk of the Sakura tree and also added some more smaller branches amongst the flowers (as you can see in the next photo). The only other thing i need to do once the details are added is seal the piece in with a protective coat of lacquer / varnish.
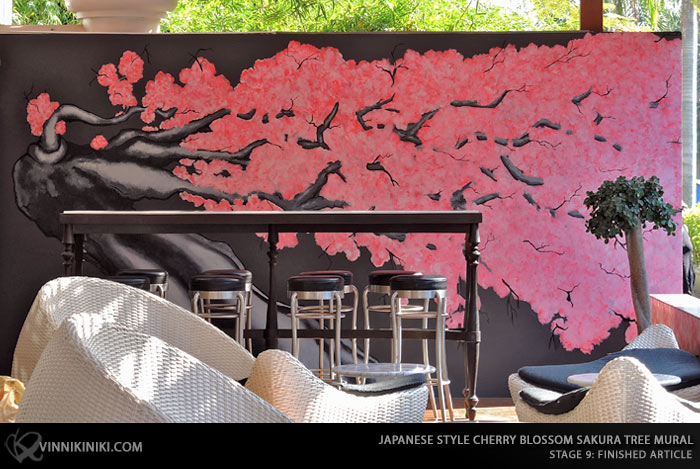
>> STAGE 9 FINISHED:
So the piece has had final details applied and semi-gloss varnish applied. I used 2 cans of spray paint semi gloss lacquer. Just a tip but bear in mind some propellants will dilute alcohol based markers or may react badly with some wet paint. Make sure all paint and markers are dry before apply a varnish or you will destroy the piece. Hint: Do a small test spot before going over the whole piece. Varnish is important in this context as it needs to be easy to wash and resistant to outdoor elements and people accidents.
This is not the first time I’ve been asked to paint a Sakura, otherwise known as a cherry blossom tree. In fact it’s the third cherry blossom mural I’ve painted. The fact that clients keep requesting them means that I must be doing something right. Either that or the Sakura tree design is immensely popular, certainly that being the case in Japan and Japanese culture.
When researching the Cherry blossom tree in preparation for painting it I was not stuck for sources of inspiration. The Sakura tree which is a very long standing powerful and beloved Japanese symbol has fame world-wide. There are countless image resources for the Sakura, painted in so many different styles! Personally I first remember seeing many Sakura image references in manga and anime, there seems to be a lot of really nice digital and comic book style art of the Cherry Blossom. On the opposite end of the visual scale there are lots of really nice interpretations of the tree in traditional Japanese style painting. Traditionally painted on rice paper with inks and brushes, however there are also really nice ones painted using more commonly accessible acrylic paints. Personally I went for something in the middle with a little extra on top.
It’s always nice to add a bit of my own personal style influence into whatever art piece I might be working on. This mural is no exception. I feel the end result is somewhat of a style Frankenstein. There’s an element of traditional Japanese art mixed with a chic restaurant graphic topped with a graffiti kind edge. The wall space measure roughly 4m x 2m so relatively small compared to some of the other murals I’ve painted. No ladders = no workout, but I sweated my ass of in the Hua Hin sunshine anyway, with levels at 40oC plus I quickly switched over to painting at night time, good thing I brought a lamp!
The materials I used for the mural were a bit of a mixed bag also. I used a tough exterior white primer for the base, everything, the flowers and the trunk of the tree. I then painted the actual branches and trunk of the tree using exterior masonry paint, it was probably overkill seeing as I’d already primed, but I wanted to guarantee the art a long lifespan. I use 3 shades of pink and a red exterior paint mixed
So that’s it really, hope you found this guide helpful, need to know anything else send a message I’m available to discuss technique and share knowledge as much as i am ready to take on your commission, let’s discuss your vision.
For another take on this style, check out my Sakura graffiti mural for a private home in Poland – same theme, more urban spray paint style, different canvas.

